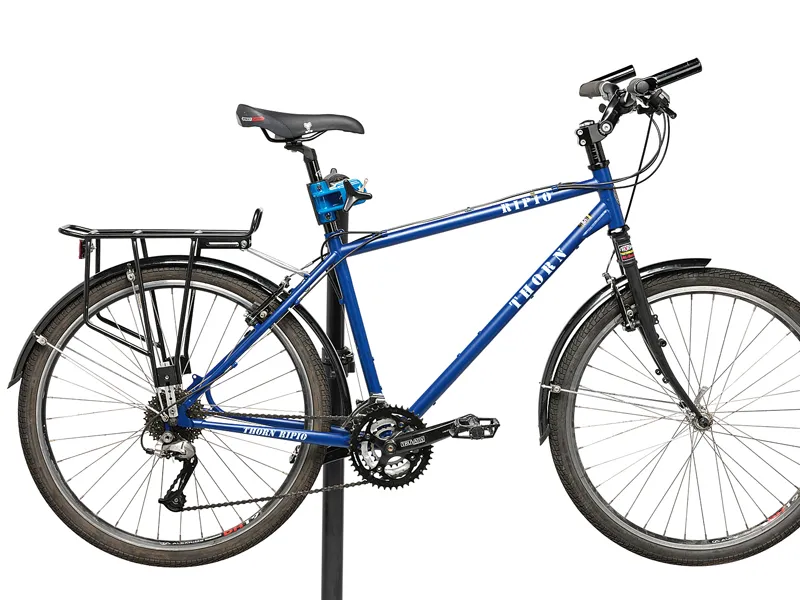
You've made gradual component upgrades to the point where your bike is now pretty nicely specced and you're simply upgrading your frame. Or maybe you're freshening up your current rig with a new steel frame in preparation for some cycle touring in far-flung places.
Whatever the case, check out these common conundrums when swapping your kit and components, highlighting any problems and how to get around them. And if you need to, you can always get a bike shop pro to tackle any issues that are beyond your abilities.
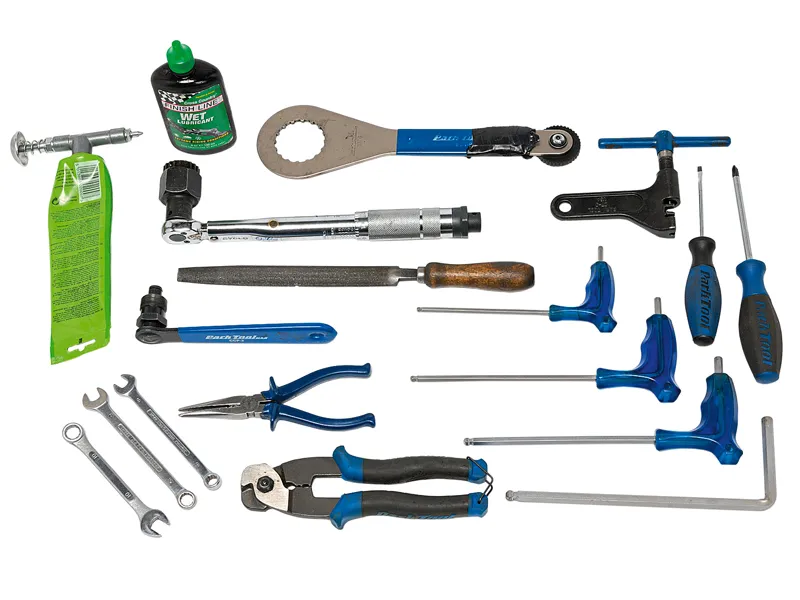
Tools required
- Allen keys and spanners
- Pliers and wire cutters
- Crank extractors and bottom bracket (BB) tools
- Oil and grease
- Torque wrench, measuring device
- Metal file/emery cloth
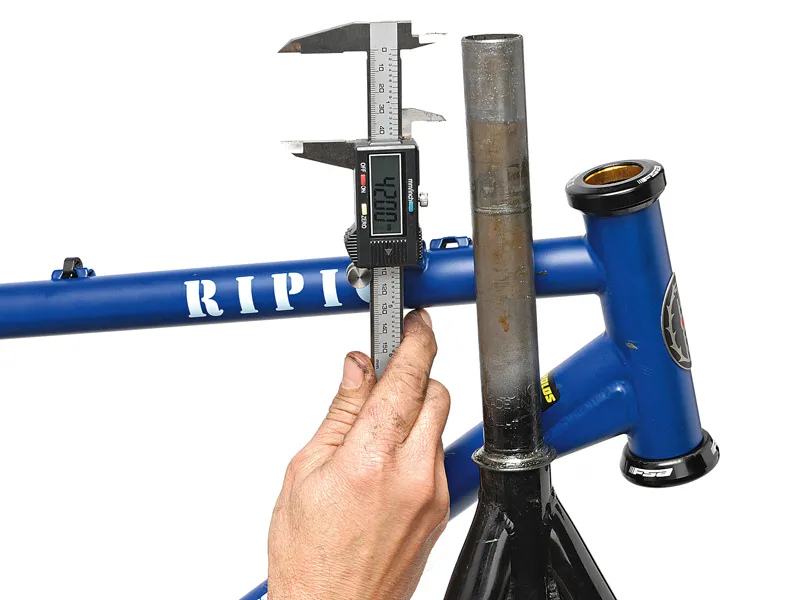
1 Fork finesse
First, measure up. If your new and old frames have the same sized head-tubes then your fork should slot in easily, once the headset has been installed. Most new frames have 11/8in steerer tubes, so if your existing fork and headset are 1in you’ll need new ones – and a new stem. To cut your fork to the correct length, you can measure it either by adding the headset stack height (usually around 42mm) to the head-tube length, along with the space taken by the stem and spacers you’ll be using, or simply preinstall the fork with your desired spacers and stem, then mark it for cutting. Don’t forget to add in a new star-fangled washer if required, allowing enough space for top cap draw-down on aheadsets.
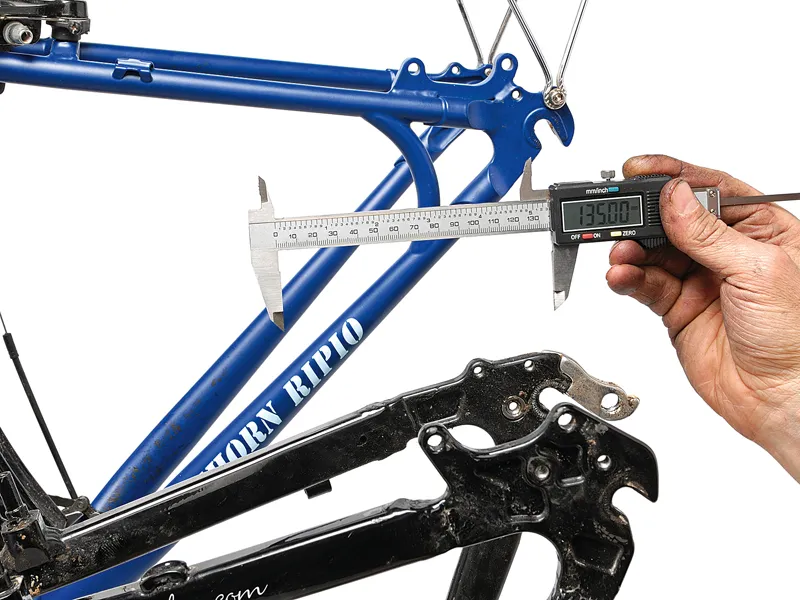
2 Rear dropout details
Measure and compare the space between the rear dropouts. This will be 130mm or 135mm (or 126mm on very old road frames). If your frame is steel, it can safely be pried open or squashed closer to accommodate the particular hub spacing, but this might increase the difficulty of roadside repairs. Respacing the rear hub is a valid solution, but will require re-dishing (re-centring) the rim between the wheel nuts. While the current standard spacing for 26in wheels tends to be 135mm, 130mm is still quite common (depending on the hub used) and is also the current standard for 700C road hubs and wheels. Ideally, space out just the left side, keeping the cassette and derailleur position untouched. If required, swap for the correct axle and re-dish.
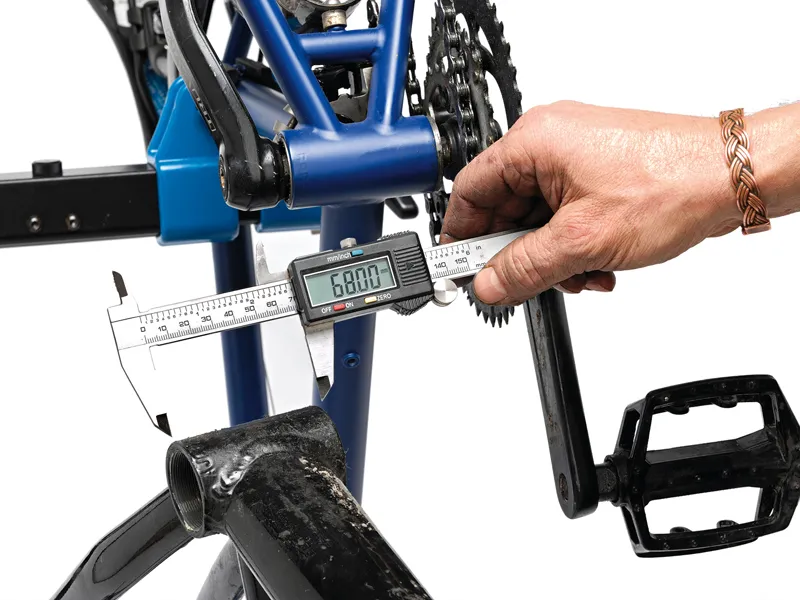
3 Measure your BB shell
Measure and compare the old and new BB shell widths as pictured, and check bearings for signs of wear before reuse. On modern two-piece cranks with external cups (such as a Deore XT triple) add or remove a cup spacer as required, while maintaining the correct crank arm and chainring clearances with the lower stays; also check for adequate front mech travel, both inwards and outwards. On standard square-tapered BBs such as Shimano’s UN series, the left non-fixed cup may be replaced with the correct version (Y-1SG05020 for 73mm, Y-1SG05030 for 68mm) if you can find them in the salvaged parts bin at your local bike shop (LBS). If not available, a complete new unit of the correct width will be required. Grease threads generously when installing.
4 Seat-tube clamp sizing
If changing from a low-grade aluminium frame to a steel one, the front derailleur clamp size will need reducing, which can usually be done with shims. Steel frames will most likely require a 27.2mm seatpost, which means the derailleur and seatpost clamp are likely to have a diameter of 28.6mm, while seat-tube outer diameters on aluminium frames are usually 32mm or 35mm. Shimano offers shims as part of its multi-pull and multi-fit front derailleurs, and you might be able to get a couple from your LBS – again, have a look through the salvaged parts bin. Before inserting the seatpost, carefully sand or file down any sharp edges or roughness in the frame that might interfere, and grease generously.
5 Frame clearance
Clearance issues can crop up during frame swaps, like the size of wheels, tyres or mudguards, especially if they’re too big. Besides the obvious measure of confirming the correct wheel size, you’ll need to inflate the tyres fully, and check clearances between stays and sidewalls as they narrow down towards the bottom bracket shell. Go to a size down if required (ie from 26x1.75 down to 26x1.5, or 35mm to 32mm if you’re running 700C wheels). Mudguard clearances at the front can change as well, so check the gap between the wheel and down-tube, as well as toe overlap. Front mechs can get hung up on mudguards, so if necessary trim the mudguard with tin snips to allow the front derailleur its full travel.
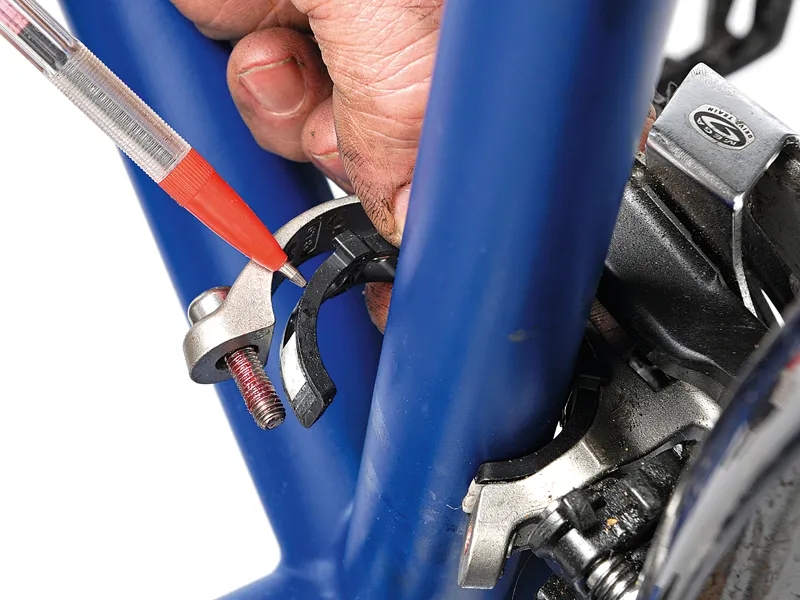
6 Brakes
Cantis, Vs or discs – that is the question. If you don't go for discs, cable hangers need to be present if you’re running old-school cantis, although the frame and fork pictured would make this difficult. Changing to V-brakes will require the correct brake lever as well, or the repositioning of the cable nipple within the lever on those models that allow it. Check that the brake pads contact the rims at the correct height and angle as pictured. To compensate for a wider or narrower brake post distance, use the appropriate spacers provided with the pads. V-brake arms should be vertical, and should be well clear of the tyres when brakes are applied.
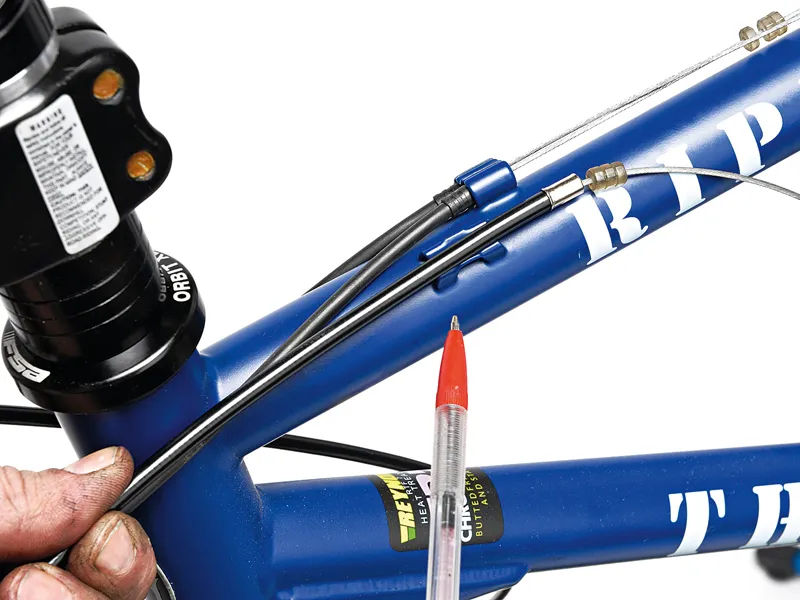
7 Cable conundrums
Expect to have to replace some of your cables to accommodate a possibly different cable run. Cable inners are likely to have been damaged by their anchor bolts, and might be too short once the damaged or frayed part is trimmed off. As long as they’re in good shape and don’t show signs of wear or damage, your rear cables can be reused on the front for both derailleur and brake, so you’ll only need to buy new rear ones. If your old frame has a different cable path to your new one (ie top-pull instead of down-pull) you’ll need to install your cables following the new route. Unless you’re running fully sealed systems, avoid using cable coverings between slotted guides, as this will hamper quick access for cleaning and lubing.
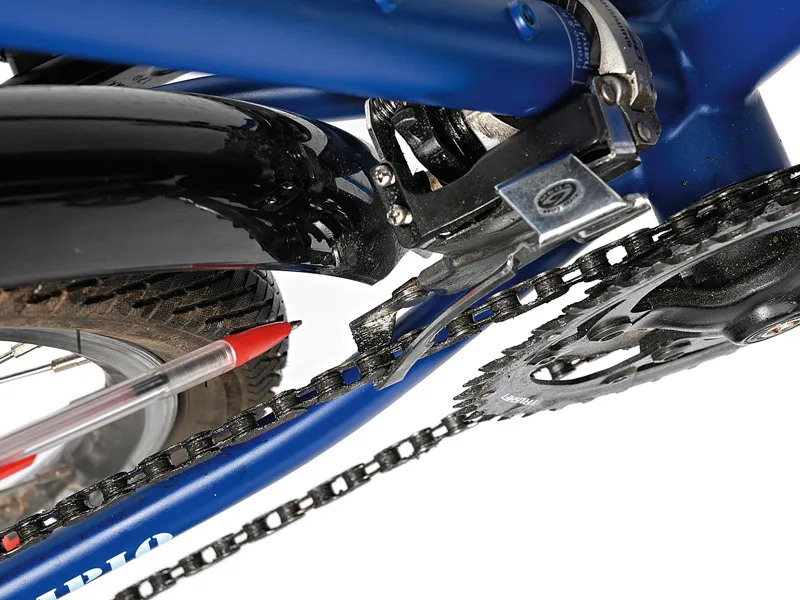
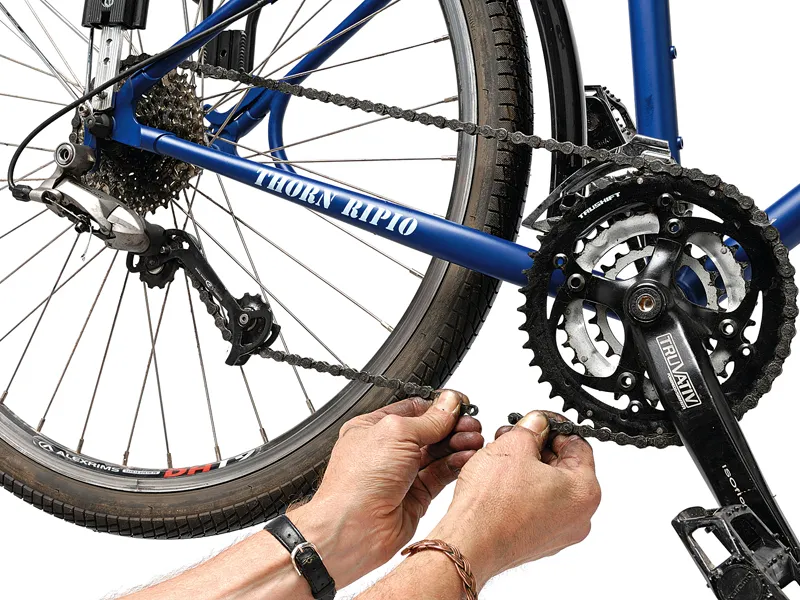
8 Chain length
First, inspect your chain for wear with a decent chain checker. Replace it if it’s worn, bearing in mind that this might also force you to replace your rear cassette. Slippage under load on any of the sprockets will mean replacing the cassette as well as the chain. If the old chain is still valid, reconnect it using either a master link (such as SRAM PowerLink), or a new rivet pin à la Shimano. Check the chain length required as follows: in the big ring and small sprocket, the derailleur pulleys should be nearly vertical, while in the big ring and big sprocket, the derailleur should have a little wind-up capability left to safely engage the large sprocket when in the big ring. If you need a longer chain, you’ll have to fit a new one.
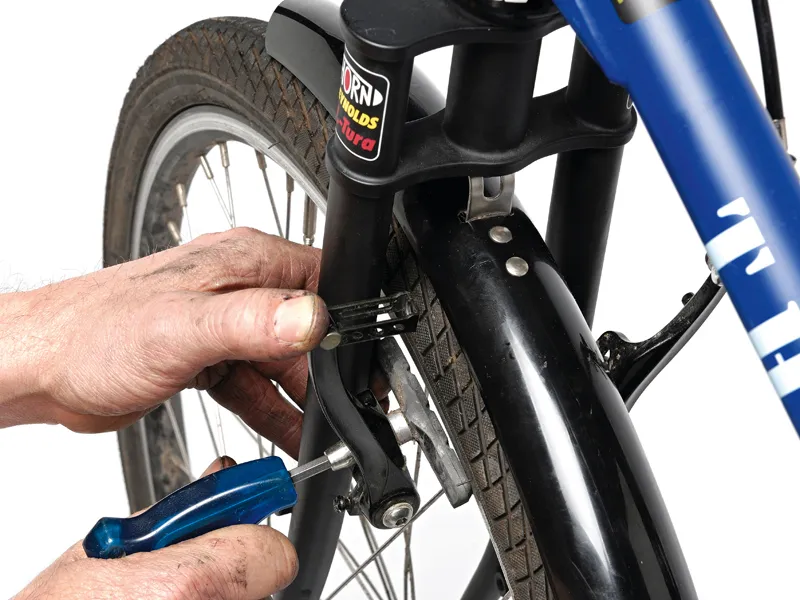
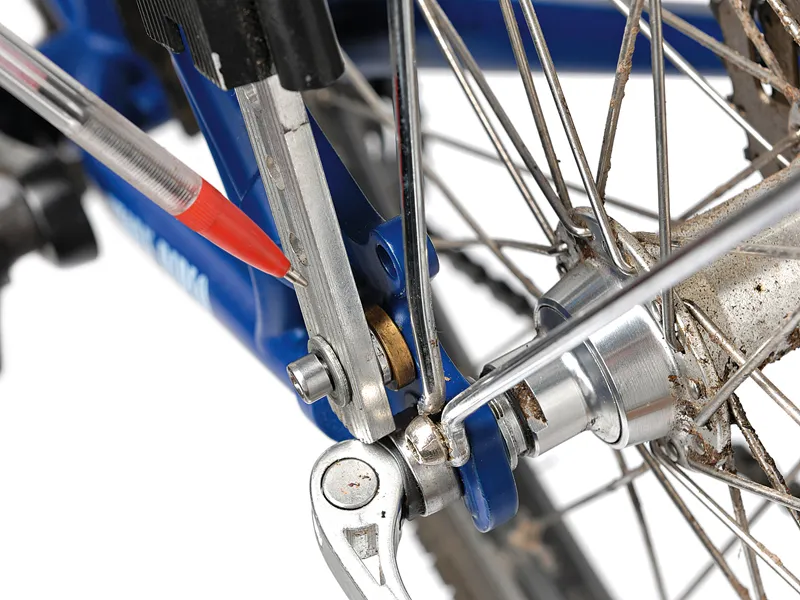
9 Rack it up
You can usually swap mudguards over without drastic modifications, but racks can prove trickier – especially if you’re running disc brakes – because the callipers can interfere with the rack struts and mounting points. Use spacers as pictured to move the strut away from the dropout and allow clearance for the brake calliper. Salvaged V-brake pad washers make excellent spacers. Many rack manufacturers produce models that get round this: Topeak’s rack with built-in offset allows ample clearance for the calliper. Fitting a too-narrowlyspaced rack will force the frame dropouts together and make wheel installation difficult. Gently pry your rack struts apart to the correct width; good quality alu or chromoly racks won’t mind this at all.
10 Test run
A test run will iron out any issues, so load it up and head out. Get a good half day’s riding in, more if you can, to give small problems time to crop up. Now check every single nut and bolt.
- Drivetrain: derailleurs, cables, gears, chain, cranks, bottom bracket and pedals.
- Wheels: spoke tension, tyres, wheel fastening.
- Cockpit: bar, stem, headset, controls, seatpost and saddle.
- Finally, accessories: check your racks, lights, computers, and any other attachments.
- Recheck the front and rear derailleur settings, including outer and inner stop screws for correct shifting without chain drop-off.
- Squeeze the brakes hard and try to twist the bar and controls: cable anchor bolts and brake pad fixing nuts should hold fast, while nothing else should budge.